
With everyone trying to improve their online presence due to the current Covid-19 pandemic, it is no surprise that many are using dSLRs as webcams to get the best image quality. Most manufactures have worked extra hard in 2020 to provide webcam utility to convert their cameras as webcams. Nikon is no exception, and they have finally released a utility to convert their cameras into powerful webcams. However, Nikon has always been a hardware company and fall short when it comes to software. I’ve struggled with their webcam utility (which is still in beta). But since I am a die-hard Nikon shooter with several camera bodies and multiple Nikkor lenses, I explored other ways to convert the camera into a webcam. Here are 3 options that I have tried along with the pros and cons of each solution.
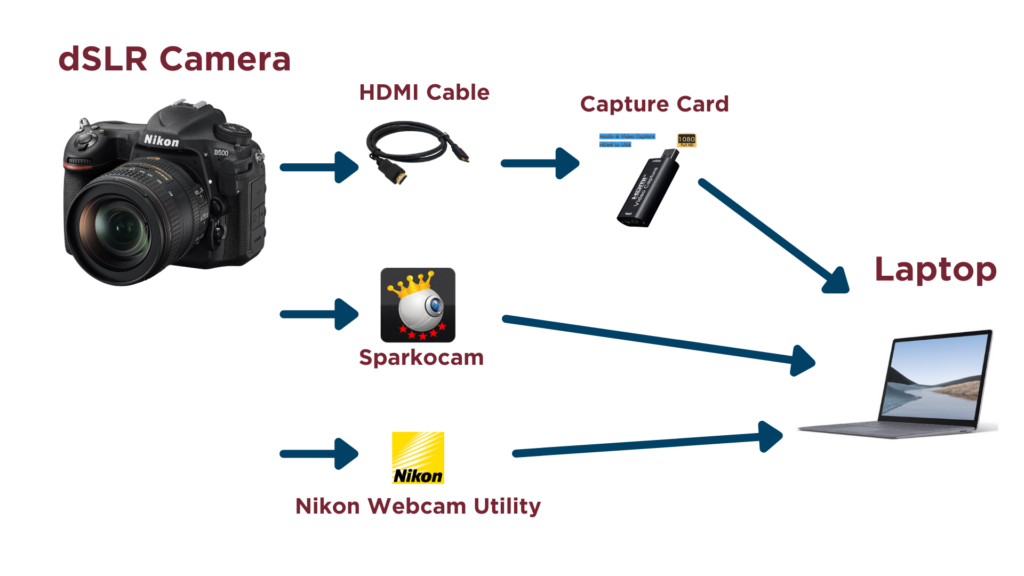
SparkoCam Application
The SparkoCam was my first attempt at converting my Nikon D800 and Nikon D500 into webcams. It is a Windows-Only application as of now. You can download the software by clicking on this link. I created a YouTube tutorial explaining the setup process for the software. You can check out the video below.
Here are my thoughts on the PROS and CONS of using the SparkoCam software.
| PROS | CONS |
| 1. Very simple to setup. All you need is a USB cable to convert the camera into a Webcam | 1. The application uses the preview screen to capture the video (which you normally see on the back of the camera). This means you don’t get very high quality image |
| 2. The software is free to try. | 2. The free version adds a watermark on the video. To get the full benefits, you need to pay for the application. |
| 3. Remotely control all aspects of the camera (focus, aperture, shutter speed). Changes are made in real time and visible on the screen. | 3. The full version costs $70, which is a steep price to pay just to convert your camera into a webcam. |
| 4. You can add text and graphic elements on top of the video | |
| 5. This is an essential tool if you want to teach photography as all the controls are visible on the screen and their effect can be observed in real time. |
HDMI Capture Card
HDMI capture cards provide an excellent choice for those who want the best video quality. A HDMI capture card grabs the video output from the camera and transfers it via USB as a webcam source. There are many capture cards on the market and you must check the compatibility of the card with your camera model. I use this one.
I used a cheap Chinese brand and it works with both my Nikon D800 and Nikon D500. On the Nikon D500, I get perfect high-quality 1080p output. However, on the D800, the image tends to get stretched. Check the video below for details.
Here are my thoughts on the PROS and CONS of using the HDMI Capture cards.
| PROS | CONS |
| 1. Highest quality that can be extracted from the camera. | 1. You cannot control the camera remotely. All settings (shutter speed, aperture etc.) has to be done manually. I prefer to set my focus to manual mode to avoid focus hunting. |
| 2. No additional software to install. Plug the device and it is up and running. The device is powered by USB so no need for additional power connection. | 2. Only cameras that support clean HDMI output work with this method. Check if your camera has this support. |
| 3. Additional hardware/cables making your setup messy and harder to setup. | |
| 4. Additional cost in purchasing the capture card, plus HDMI cable. |
Nikon Official Webcam Utility
The next option to convert your Nikon dSLR into a webcam is to use the official Nikon webcam utility. You can download the utility by clicking on this link.
The Webcam utility is still in beta. As of this writing, the utility supports the following camera models:
Nikon Z 7II, Z 7, Z 6II, Z 6, Z 5, Z 50, D6, D5, D850, D810, D780, D750, D500, D7500, D7200, D5600, D5500, D5300, and D3500
If you own any of the above models, then the webcam utility should be your first choice to experiment.
Here are my thoughts on the PROS and CONS of using the Nikon Webcam utility.
| PROS | CONS |
| 1. It’s the official product from the manufacturer. If you own one of the compatible product, you should definitely try it out. | 1. You cannot control the camera remotely. All settings (shutter speed, aperture etc.) has to be done manually. I prefer to set my focus to manual mode to avoid focus hunting. |
| 2. No additional hardware. All you need is the USB cable that came with your camera. Install the software and you are up and running. | 2. Very limited camera support as listed above. |
| 3. Decent video quality. You don’t get the full 1080p that you get with the capture cards. The frame size is limited to 768p (XVGA) but should be acceptable for online meetings. | |
| 4. Completely FREE. |
Final Thoughts
Regardless of what option you try, using a dSLR as a webcam has one major limitation. The battery. You will get around 20 to 30 minutes on a single battery charge. This can be a problem if you are in the middle of an important session and your battery dies and you are without a webcam. You can change the batteries, but that can be quiet awkward.
If you are serious about using the camera as a webcam for extended duration, you must consider investing in a dummy battery. A dummy battery has the same shape as the camera battery but is powered from an external source. Check the video below on how to setup a dummy battery.